What Are Common Electronics Projects for Beginners? Simple DIY Ideas to Learn Circuits, Components, and Reuse
You’ve probably looked at a circuit board before and wondered how all those tiny parts work together. The blinking lights. The little black chips. The thin metal lines running everywhere like roads on a map.
Here’s the good news. You don’t need a degree to start. You just need a few cheap parts, a little patience, and one simple project.
This guide walks you through the most common electronics projects for beginners. You’ll learn what to build first, what tools you actually need, and how to stay safe. You’ll also learn something most guides skip. A lot of broken electronics around your house are full of free parts you can reuse.
Learning electronics is like learning a new language. First you learn a few words. Then you build whole conversations. By the end of this guide, you’ll know exactly where to start your first conversation with a circuit.
Quick truth to hold onto: nearly every electronics engineer alive today started with one simple LED that turned on for the first time. That tiny win is where it all begins.
Introduction: Why Electronics Is Easier Than It Looks
Most people think electronics is hard. They picture math, melted solder, and sparks. So they never start.
But here’s the thing. Maybe electronics isn’t as difficult as you thought.
Electronics projects matter because they teach you by doing. You stop guessing how things work. You start seeing it with your own eyes. A light turns on. A buzzer beeps. A sensor reacts. That feedback is what makes learning stick.
The smart move is to start small. Tiny projects build real skills fast. They cost almost nothing. And they keep you motivated because you finish them in an afternoon.
In this guide you’ll learn:
- What beginner electronics projects are and why they work
- Which tools and parts you need to begin
- Common projects you can build today, step by step
- How to reuse parts from old electronics
- How to stay safe the whole way
There’s an old saying. Don’t dig a well when you’re already thirsty. The best time to learn electronics is before you need to repair something. So let’s get you started now.
One more bonus. Many of these projects need only a breadboard, which means you can learn without ever picking up a soldering iron.
What Are Beginner Electronics Projects?
A beginner electronics project is a small, safe build that teaches you one idea at a time. Think a single light, a simple alarm, or a basic sensor. Nothing fancy. Nothing dangerous.
These projects use low power and just a few parts. That keeps the risk low and the learning high.
You don’t need expensive tools. You need simple lessons. You don’t need advanced coding. You need practical experience. Beginner projects give you both.
Simple Definition of a Beginner Electronics Project
A beginner electronics project is the training wheels of electronics.
It uses low voltage, a small number of parts, and clear steps. The goal isn’t to impress anyone. The goal is to teach you one concept and let you see it work.
The best first projects skip the complexity. They focus on a single idea, like “current makes an LED glow.” Master that, then move on.
Why Electronics Projects Are a Good Way to Learn
Would you rather read about a bicycle or learn by riding one?
That’s the power of project-based learning. People remember what they build far more than what they read. When you wire your own circuit, the lesson stays with you.
Here’s a quick example. You can read ten pages about resistors. Or you can add one resistor to an LED and watch it survive instead of burning out. The second way takes five minutes and you’ll never forget it.
Projects also show you cause and effect. You connect a wire, something happens. You move it, something changes. That loop trains your brain to think like an engineer.
What Makes a Project Beginner-Friendly?
Not every project is a good starting point. Look for these signs before you build.
- Low voltage. Anything you can power with a small battery is usually safe to learn on.
- Few components. Fewer parts means fewer things to get wrong.
- Easy troubleshooting. If a problem is simple to spot and fix, you’ll keep going.
- Low cost. Cheap parts mean you can experiment without fear.
One more tip. Pick projects with visible results. A light that turns on or a buzzer that sounds gives you instant feedback. Small wins build big skills.
What Tools and Components Do Beginners Need?
You don’t need a workshop full of equipment. You need a few reliable tools.
In fact, most beginners get started with less than $50 worth of gear. A starter kit covers nearly everything on this list in one box. Below is the short, honest list of what actually matters when you’re new.
Think of this as your starter toolbox. Buy these once and you’ll build dozens of projects with them.
Basic Components: LEDs, Resistors, Batteries, Switches, and Wires
These are the building blocks of almost every beginner circuit. Here’s what each one does.
- LEDs. Small lights that glow when current flows. They give you instant visual feedback, which is why they’re the perfect first part.
- Resistors. Tiny parts that slow down current so your LEDs and chips don’t burn out. Think of them as speed bumps for electricity.
- Batteries. Your power source. A simple coin cell or a 9V battery runs most starter projects.
- Switches. Little buttons or levers that turn current on and off. They put you in control of the circuit.
- Wires. The roads that carry current from one part to the next.
With just these five things, you can build a working circuit today.
Breadboards and Jumper Wires
A breadboard is a small plastic board full of holes. You push parts and wires into it to build circuits with no soldering at all.
This is huge for beginners. You can test an idea, pull it apart, and try again in seconds. Pair it with jumper wires, which are short pre-made wires that snap into the board.
Benefits of a breadboard:
- No soldering needed to start
- Reuse parts over and over
- Fix mistakes fast by moving one wire
- Build and test in minutes
One heads-up. Most beginner mistakes come from loose jumper wires that aren’t pushed in all the way. If your circuit acts weird, check your connections first. It’s a relief to know the fix is usually that simple.
Multimeter
A multimeter is a small testing tool. It tells you how much voltage, current, or resistance is moving through your circuit.
For a beginner, it answers the big question: “Is power actually getting where I think it is?”
This one tool builds real confidence. A multimeter often solves a problem faster than guessing ever will. When a circuit won’t work, a quick measurement points you straight to the issue.
Arduino or Microcontroller Board
An Arduino is a small programmable board. You write simple code on a computer, send it to the board, and the board controls your circuit.
This is where electronics gets exciting. You can blink lights, read sensors, and run motors, all with a few lines of code.
Arduino speeds up learning because software and hardware meet in one project. You see your code turn into real-world action. That connection is what hooks most people for good. We’ll cover beginner Arduino projects in detail below.
Soldering Iron: Helpful but Not Required at First
A soldering iron melts metal to join parts permanently. It’s useful later, but you don’t need it on day one.
In fact, you shouldn’t rush it. Spend your first weeks learning circuits on a breadboard before you ever pick up a soldering iron. Learn how parts work together first. Soldering is a skill you add once the basics feel natural. No pressure, no burns, no stress.
Common Electronics Projects for Complete Beginners
Now for the fun part. These are real projects you can build with the parts above.
They’re arranged from easiest to hardest. First you light an LED. Then you build sensors. Eventually, you create simple automation. Follow them in order and each one teaches you something new.
Each project card below shows what it does, what it teaches, and how hard it is. Pick one and start today.
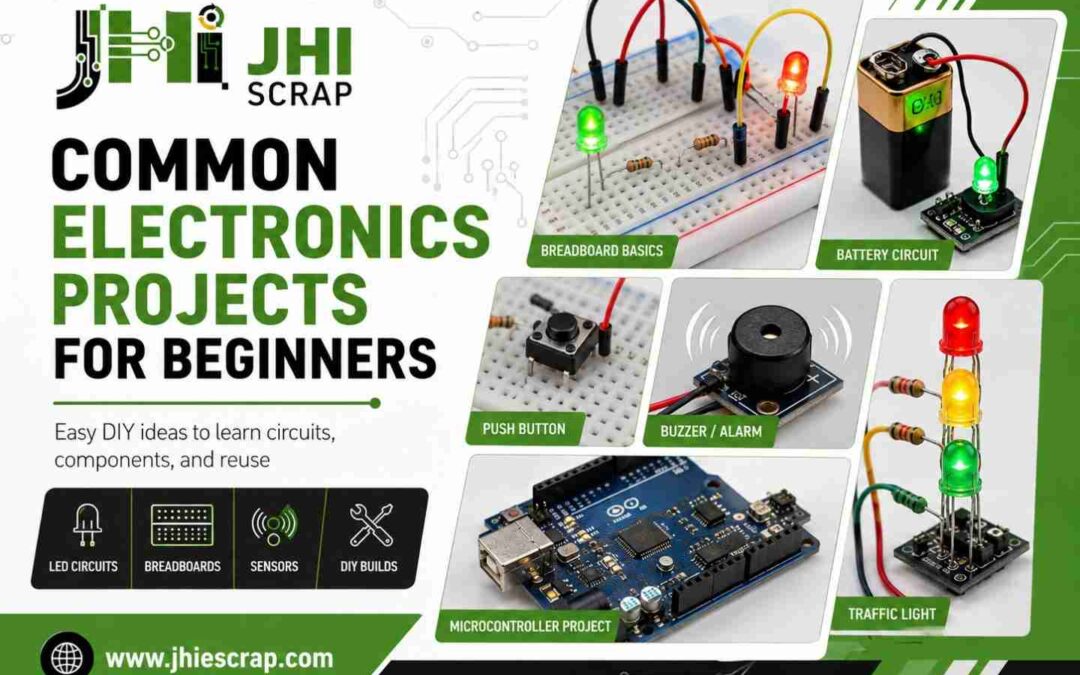
Simple LED Circuit
- Purpose: Turn on a single LED with a battery and resistor.
- Components: LED, resistor, battery, wires.
- Skill learned: How current flows through a basic circuit.
- Difficulty: Very easy.
This is the “hello world” of electronics. You connect a battery to an LED through a resistor, and the light glows. Simple, but it teaches you the core loop of every circuit.
Blinking LED Circuit
- Purpose: Make an LED flash on and off by itself.
- Components: LED, resistor, timer chip or transistor, capacitor, battery.
- Skill learned: How timing parts control a circuit.
- Difficulty: Easy.
Now your LED moves. This project shows you how a circuit can do something on a schedule without you touching it.
LED Traffic Light
- Purpose: Light up red, yellow, and green LEDs in order.
- Components: Three LEDs, resistors, breadboard, battery.
- Skill learned: Controlling more than one output.
- Difficulty: Easy.
A fun build that feels real. You’re now juggling several lights, which is your first taste of managing a small system.
Push Button LED Circuit
- Purpose: Turn an LED on only when you press a button.
- Components: LED, resistor, push button, battery, wires.
- Skill learned: How inputs control outputs.
- Difficulty: Easy.
This one adds your first input. Press the button, the light reacts. That’s the basic idea behind every switch and sensor you’ll ever build.
Buzzer Alarm Circuit
- Purpose: Make a buzzer sound when a switch closes.
- Components: Buzzer, switch, battery, wires.
- Skill learned: Sound output and simple triggers.
- Difficulty: Easy.
Would you rather a circuit you can see or one you can hear? This one beeps, which makes testing satisfying and loud.
Door or Window Alarm
- Purpose: Sound a buzzer when a door or window opens.
- Components: Buzzer, reed switch or contact switch, battery.
- Skill learned: Using a switch as a sensor.
- Difficulty: Easy.
Your first useful gadget. Stick it on a door and it warns you when the door opens. Simple parts, real-world job.
Rain Alarm
- Purpose: Beep when water touches a sensor.
- Components: Buzzer, simple water sensor, transistor, battery.
- Skill learned: Detecting the world around the circuit.
- Difficulty: Easy to medium.
Now your circuit senses something physical. Water bridges two contacts, the alarm sounds. It feels like magic the first time.
Automatic Night Light
- Purpose: Turn on a light when the room gets dark.
- Components: LED, light sensor (LDR), transistor, resistor, battery.
- Skill learned: Building circuits that respond to their environment.
- Difficulty: Medium.
This is automation in its simplest form. The circuit decides when to act, not you. Cover the sensor and watch the light pop on.
Fire or Heat Alarm
- Purpose: Sound an alarm when temperature rises.
- Components: Buzzer, heat sensor (thermistor), transistor, battery.
- Skill learned: Reacting to temperature changes.
- Difficulty: Medium.
A safety-minded build that teaches you how sensors read heat. Great practice before you move into Arduino sensor projects.
Water Level Indicator
- Purpose: Light up as water rises in a tank.
- Components: LEDs, water probes, transistors, resistors, battery.
- Skill learned: Reading levels and showing them with lights.
- Difficulty: Medium.
Your most “useful” beginner project. People actually put these in tanks at home. It pulls together lights, sensing, and a bit of logic.
Ready for the next step? Once these feel easy, it’s time to add code. That’s where Arduino comes in.
Common Arduino Projects for Beginners
So far your circuits do one fixed job. Arduino changes that. With a few lines of code, your hardware can think, react, and adapt.
The same Arduino that blinks an LED today can control a robot tomorrow. That’s why beginners love it.
Here’s the key mindset. You are not learning code for the sake of code. You are learning code to make hardware come alive. Keep that in mind and the projects below will feel exciting, not scary.
One honest warning. Many beginners fail because they jump straight into robots. Don’t. Start with LEDs and sensors first. Then build up. The projects below follow that exact path.
Arduino Blinking LED
- Purpose: Make an LED blink using code.
- Components: Arduino, LED, resistor, wires.
- Skill learned: Basic Arduino code and timing.
- Difficulty: Very easy.
This is your first Arduino project, and it’s a big one. It teaches you almost every code structure you’ll use later. Set a pin high, wait, set it low, wait. Master this and the rest gets easier fast.
Temperature and Humidity Monitor
- Purpose: Read room temperature and humidity, then show it.
- Components: Arduino, DHT sensor, wires.
- Skill learned: Reading data from a sensor.
- Difficulty: Easy.
Now your project gathers real information. Most people grin the first time they see live room data scroll across their screen. It feels like you built a tiny weather station.
Soil Moisture Sensor
- Purpose: Check if soil is dry and react to it.
- Components: Arduino, soil moisture sensor, LED or buzzer.
- Skill learned: Turning sensor data into action.
- Difficulty: Easy.
This is your first taste of automation logic. If the soil is dry, do something. Plant lovers use this to build simple smart-watering setups. Real value, real fast.
Ultrasonic Distance Sensor
- Purpose: Measure the distance to an object.
- Components: Arduino, ultrasonic sensor, wires.
- Skill learned: Measuring the physical world with sound.
- Difficulty: Easy to medium.
Fun and a little wild. The sensor sends out sound and listens for the echo. Many robot projects begin right here, since robots need to know what’s in front of them.
Mini Servo Motor Project
- Purpose: Move a small motor to set positions.
- Components: Arduino, servo motor, wires.
- Skill learned: Controlling movement with code.
- Difficulty: Medium.
Your circuit now moves on command. Watching a motor swing exactly where your code told it to is a huge motivator. This is the building block for arms, gates, and robots.
Simple Robot Car
- Purpose: Build a small car that drives and turns.
- Components: Arduino, motors, wheels, motor driver, battery, chassis.
- Skill learned: Combining motors, power, and code.
- Difficulty: Medium.
Every robot starts with a few simple components. This project ties together everything you’ve learned. Power, motors, code, and control all working as one. It’s the proudest moment for most beginners.
LCD Display Project
- Purpose: Show text or numbers on a small screen.
- Components: Arduino, LCD module, wires.
- Skill learned: Sending output to a display.
- Difficulty: Medium.
No more guessing what your code is doing. Now it tells you, right on the screen. This pairs perfectly with your sensor projects.
RGB LED Color Mixer
- Purpose: Mix red, green, and blue light into any color.
- Components: Arduino, RGB LED, resistors, wires.
- Skill learned: Smooth control using PWM.
- Difficulty: Medium.
An RGB LED works like a tiny paint palette controlled by code. You blend three colors to make millions. It’s creative, colorful, and a great way to learn fine control.
Electronics Projects Using Recycled or Salvaged Parts
Here’s a secret most beginners miss. You’re surrounded by free electronic parts. Old remotes, broken toys, dead printers, and tired chargers are full of usable components.
Waste not, want not. Before you buy new, look at what you already have.
Reusing parts saves money and cuts down on electronic waste. It also teaches you to recognize real components in the wild, which is a skill no kit can give you. Let’s look at what’s worth saving.
Reusing LEDs from Old Electronics
LEDs are everywhere. They sit inside remotes, toys, appliances, and old gadgets.
Most are easy to spot and easy to remove. Pull a few out, test them, and drop them into your next project. It’s a quick win that makes recycling feel rewarding.
Reusing Motors from Old Toys or Printers
Old toys and printers are goldmines for small motors. Remote control cars, disc drives, and inkjet printers all use them.
These motors are perfect for your robot car or any moving project. Reusing one feels great and saves you a few dollars every time.
Reusing Speakers, Buzzers, and Wires
Don’t toss that broken radio just yet. Small speakers, buzzers, and lengths of wire are some of the easiest parts to salvage.
They pull out fast and work in alarm and sound projects right away. Wire especially is something you’ll always need more of.
Reusing Switches, Buttons, and Connectors
Switches, buttons, and connectors hide inside almost every device. Game controllers, keyboards, and appliances are packed with them.
These small parts add control to your projects. Snap them out and keep a little parts bin going.
When Salvaging Parts Is Not Worth It
Reuse is great, but be smart about it.
Some parts aren’t worth the effort. If a component is cracked, burnt, or rusted, skip it. Trust your gut. A part that looks damaged usually is.
Also remember your time has value too. Don’t spend an hour saving a 10-cent part. And some items are simply too risky to open, which we’ll cover next. When old electronics pile up beyond what’s safe or useful to salvage, the right move is responsible recycling, not the trash.
Electronics Projects Beginners Should Avoid at First
You may feel tempted to open every electronic device you find. That curiosity is good. But some devices are simply not beginner-friendly, and a few can hurt you.
The truth is plain. Most beginner injuries happen on projects that go beyond a person’s current skill level. So skip the four things below until you’ve built real experience.
High-Voltage Projects
Anything that plugs into a wall outlet carries dangerous voltage. That includes lamps, chargers ripped open, and home wiring.
Wall power can injure or kill. As a beginner, stick to battery-powered, low-voltage circuits only. There’s plenty to learn there without the risk.
Lithium Battery Repair or Modification
Lithium batteries power phones, laptops, and many tools. They’re useful, but they don’t forgive mistakes.
Never try to repair, puncture, or modify one. Damaged lithium batteries can ignite without warning. If a battery is swollen or leaking, stop and recycle it properly.
Microwave, TV, and Power Supply Tear-Downs
These devices hide a nasty surprise. Large capacitors inside can store a dangerous charge long after you unplug them.
Microwaves and old TVs are the worst offenders. Respect the risk and leave these to trained pros. The parts inside aren’t worth the danger.
Complex Soldering or Tiny Surface-Mount Components
Some parts are smaller than a grain of rice. They take steady hands, fine tools, and lots of practice.
Trying these too early just leads to frustration. Learn the large components first. Learn the tiny components later. Your patience will thank you.
Safety Tips Before Starting Electronics Projects
Safety isn’t about fear. It’s about building with confidence, knowing you’ve got the basics covered.
The carpenter’s rule says measure twice, cut once. For electronics, we say it a little differently. Check twice, power once. A quick review before you flip the switch saves parts, time, and stress.
Here’s your simple safety checklist.
Start with Low Voltage
Low voltage is your friend as a beginner. It keeps the risk small while you learn.
A good rule of thumb is to stay below 12 volts while you’re starting out. Most beginner projects run happily on small batteries. There’s no need to go higher yet.
Check Polarity Before Powering a Circuit
Many parts care which way the current flows. LEDs, capacitors, and chips have a plus side and a minus side.
Connect them backward and they may not work, or they may get damaged. Take a breath, check the direction, then power up. It’s a small habit that saves a lot of dead parts.
Use a Resistor with LEDs
This one tip saves more LEDs than any other. An LED without a resistor often burns out in an instant.
Always pair your LED with the right resistor. It limits the current and keeps your light glowing for years. Confidence comes from knowing your parts will survive.
Keep Batteries Away from Heat and Metal Objects
Batteries deserve respect, even small ones. Keep them away from heat sources and loose metal.
A stray coin or paperclip can short a battery and cause it to heat up fast. Store batteries in a cool, dry spot, away from anything metal.
Recycle Unsafe or Damaged Electronics Properly
When a device is too risky to open or a battery is damaged, don’t toss it in the regular trash. Damaged electronics can leak or even catch fire in a bin.
Take them to a proper recycler instead. In the Phoenix area, Jay Hoehl Inc handles e-waste recycling the safe, responsible way. It protects you, your home, and the environment.
How Old Electronics Can Help Beginners Learn
Here’s a fresh way to think about that drawer of dead gadgets. Every old device is a classroom hiding inside a plastic case.
You don’t have to build everything from a kit. Old electronics show you how real products are made. And that’s a lesson worth more than gold.
Old Devices Show How Real Circuits Are Built
Kits are clean and simple. Real products are not. Opening an old radio or printer shows you how engineers actually lay out a circuit.
You’ll see how parts connect, how boards are organized, and how power flows through a real design. That curiosity-driven look teaches things no tutorial can.
Beginners Can Learn by Identifying Components
Open an old board and play a game. Try to name every part you see.
That’s a resistor. That’s a capacitor. That’s a chip. Over time you’ll recognize parts at a glance. Identifying real components builds the kind of confidence that makes everything else click.
Some Electronics Have Reusable or Scrap Value
Beyond learning, old electronics hold real value. Many parts can be reused. Others contain small amounts of valuable metals.
Circuit boards, connectors, and chips often have worth, even when the device is dead. It pays to look before you throw anything away.
Not Every Electronic Item Should Go in the Trash
Here’s the responsible part. Old electronics don’t belong in the regular garbage. They can leak harmful materials into the ground.
Reuse what you safely can. Then recycle the rest. It’s a simple habit that cuts electronic waste and keeps useful materials in the loop.
Best Electronics Projects by Skill Level
Don’t chase complexity. Chase consistency. The fastest way to grow is to climb one step at a time.
This roadmap shows you exactly where to go next. Success comes from stacking small wins, so pick the level that fits you today.
Easy Level: No Programming
Start here if you’ve never built a circuit. These projects use only basic parts and zero code.
Good picks: simple LED circuit, push button LED, buzzer alarm, and a basic night light. They teach you how current, switches, and outputs work together.
Beginner Plus: Basic Sensors
Now add inputs. Sensors let your circuit react to the world.
Try a rain alarm, a light sensor circuit, or a heat alarm. You’ll learn how a circuit “feels” its surroundings and responds.
Arduino Beginner: Simple Coding
Time to add software. Pick up an Arduino and start with code.
Begin with the blinking LED, then a temperature monitor, then a soil moisture sensor. Each one teaches a core coding idea you’ll use forever.
Intermediate: Motors, Displays, and Automation
Now you combine it all. This is where projects start to feel powerful.
Build a servo project, an LCD readout, or a simple robot car. You’re moving from single circuits into real automation. From here, the only limit is your imagination.
What Is the Easiest Electronics Project to Start With?
What’s more motivating than flipping a switch and seeing something happen?
If you want the single easiest place to start, here are the top picks. Each one gives instant feedback, which is exactly what teaches you the fastest. Pick one and start building today.
Best First Project: LED Circuit
The simple LED circuit wins for a reason. It’s cheap, safe, and works in minutes.
You connect a battery, a resistor, and an LED, and the light glows. That first glow teaches you the core idea behind every circuit you’ll ever build.
Best First Arduino Project: Blinking LED
If you want to start with code, blink an LED with an Arduino. It’s the classic first step into programmable electronics.
This tiny project teaches the structure behind almost every Arduino program. Nail it and the door to sensors, motors, and robots swings wide open.
Best Recycled-Part Project: Salvaged LED or Motor Test
Want to start with free parts? Pull an LED or a small motor from an old device and test it.
Hook the LED to a battery and resistor, or spin the motor with a small power source. You learn salvage skills and circuit basics at the same time. It’s the most budget-friendly start there is.
What Should Beginners Do With Old or Broken Electronics?
One person’s broken device can become another person’s learning opportunity. So before you trash that pile of old gadgets, run through this simple plan.
The goal is to keep what’s useful, stay safe, and recycle the rest the right way.
Keep Safe, Useful Parts for Learning
Start by saving the good stuff. LEDs, motors, switches, wires, and connectors are all worth keeping.
Build a small parts bin and add to it over time. Free parts today become finished projects tomorrow.
Separate Batteries and Damaged Devices
Before anything else, pull out the batteries. This is the most important safety step.
Set damaged or swollen batteries aside for proper recycling. Never leave them loose with metal objects or in a hot space. Separate first, then sort the rest.
Recycle Electronics That Cannot Be Repaired or Reused
Some devices are simply done. They’re broken beyond repair and hold no safe parts to salvage.
Don’t put these in the trash. Take them to a certified electronics recycling center so the materials get handled the right way.
Businesses Should Not Throw Bulk Electronics in the Trash
This part is for the companies out there. If your business piles up old computers, servers, or industrial gear, the trash is the wrong answer.
Bulk e-waste needs secure, responsible disposal. There are legal, environmental, and data-security reasons to do it right.
In Phoenix, Arizona, Jay Hoehl Inc has handled industrial e-waste and surplus since 1980. The team offers full IT asset disposition for retired computers and drives, surplus electronics buying for extra inventory, and excess inventory management for ongoing overstock. They also buy test equipment and SMD components. If your facility is buried in old electronics, you can schedule a pickup through their contact page.
Common Beginner Electronics Project Ideas List
Want a quick list to spark ideas? Here you go. Mix LED projects, sensors, motors, and Arduino builds, and you’ll never run out of things to make.
20 Easy Electronics Projects for Beginners
- Simple LED circuit that lights up with a battery
- Blinking LED that flashes on its own
- LED traffic light with red, yellow, and green
- Push button LED that turns on when pressed
- Buzzer alarm that beeps on a switch
- Door or window alarm that sounds when opened
- Rain alarm that beeps when water hits a sensor
- Automatic night light that glows in the dark
- Fire or heat alarm that reacts to high temperature
- Water level indicator that lights up as a tank fills
- Arduino blinking LED controlled by code
- Temperature and humidity monitor with a DHT sensor
- Soil moisture sensor that checks dry soil
- Ultrasonic distance sensor that measures space
- Servo motor controller that moves on command
- Simple robot car that drives and turns
- LCD display project that shows live text
- RGB LED color mixer that blends any color
- Salvaged LED tester built from old electronics
- Recycled motor spinner powered by a reused motor
Start at number one and work your way down. By the time you reach the bottom, you’ll be building things you never thought you could.
FAQs About Beginner Electronics Projects
What is the easiest electronics project for a beginner?
The simple LED circuit is the easiest. You connect a battery, a resistor, and an LED, and the light turns on in minutes. It teaches the core idea behind every circuit and costs almost nothing to build.
Do I need to know how to code to start electronics?
No. Many great beginner projects use zero code. Things like LED circuits, alarms, and night lights work with basic parts only. You can add coding later with an Arduino once you feel ready.
Is Arduino good for absolute beginners?
Yes. Arduino is one of the friendliest ways to learn. You write simple code, send it to the board, and watch your hardware react. Start with the blinking LED project, then move on to sensors.
Can I build electronics projects without soldering?
Absolutely. A breadboard lets you build circuits with no soldering at all. You push parts and wires into the board, test your idea, and pull it apart to try again. Most beginners learn this way first.
Are parts from old electronics safe to reuse?
Many are. LEDs, motors, switches, and wires are usually safe to salvage and reuse. Just avoid lithium batteries, large capacitors, and anything from high-voltage devices. When in doubt, leave it out and recycle the device instead.
Do old circuit boards have any value?
Sometimes, yes. Circuit boards can contain small amounts of valuable metals, and many parts can be reused. For businesses with bulk boards, a recycler like Jay Hoehl Inc can assess and process them properly.
How do I dispose of electronic waste the right way?
Pull out the batteries first, then take the device to a certified electronics recycler. Don’t throw electronics in the regular trash. In Phoenix, you can contact Jay Hoehl Inc for safe e-waste and surplus handling.
How much money do I need to start learning electronics?
Less than you think. A basic starter kit with a breadboard, LEDs, resistors, wires, and a few sensors usually costs under $50. Reusing parts from old electronics can lower that even more.
Final Thoughts: Start Small, Learn Safely, and Recycle Responsibly
Here’s the whole journey in one breath. Start with a single LED. Add a switch. Add a sensor. Pick up an Arduino. Build a robot. Each step is small, but they add up fast.
Remember this. Every advanced builder you admire started exactly where you are now. Every advanced circuit begins with a single LED.
You don’t need expensive tools. You need consistent practice. You don’t need to be fearless. You need to build safely, one low-voltage project at a time. And when old electronics pile up, reuse what you can and recycle the rest properly.
So here’s your move. Choose one project today, build it safely, and keep learning. That first glowing LED is closer than you think.
Looking for more electronics and recycling guides? Visit the Jay Hoehl Inc blog. For Phoenix-area e-waste recycling, surplus electronics, and IT asset disposition, explore our services or get in touch.
Jay Hohel INC